![[LDP]](/moin_static184/ldp/tldp.png)

Attachment 'install-a.html'
Download5. Initial Configuration (a.) - installation instructions for all the necessary software for all configurations.
I installed all the necessary programs from the source in /usr/local. I left some configuration files in /usr/local/etc and moved some in /etc/. There are Slackware packages on SlackBuilds.org or you can make your own if you decide it is worth the effort, considering that installing it from source is easier.
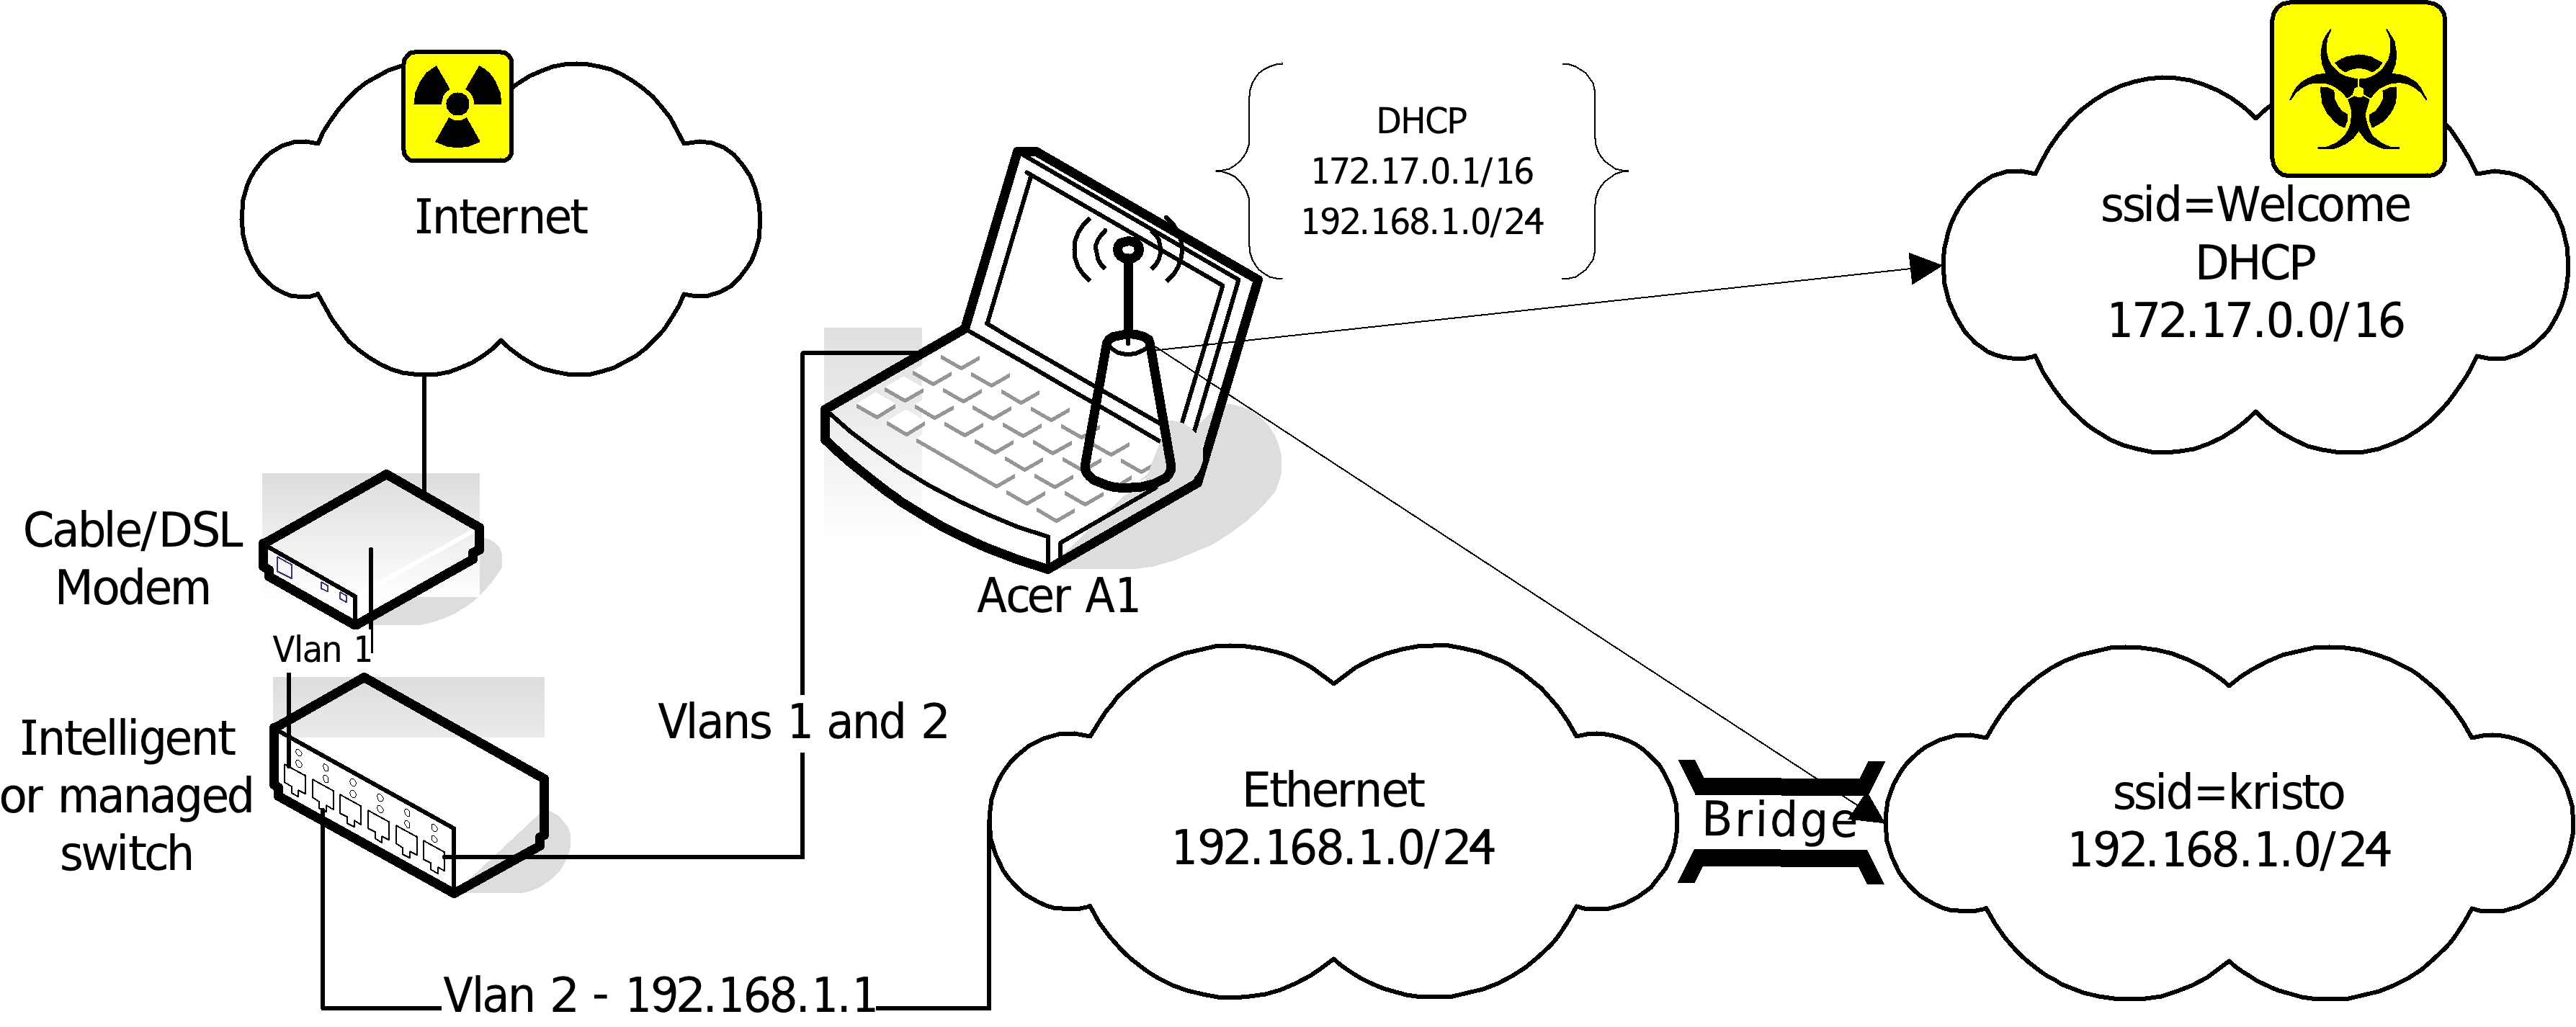
5.1. The easiest way of installing Slackware on Acer Aspire One
his chapter is probably unnecessary, but I love to preach about Slackware.
You need a Linux FTP server, to host a Slackware and a USB stick.
First you have to create a Slackware mirror by getting the script mirror-slackware-current.sh from Alien Pastures and running it. The script will put the mirror by default in the /home/ftp directory, which is exactly where you need it for the last step.
After this is done insert a USB stick, go to the directory
/home/ftp/pub/Linux/Slackware/slackware-current/usb-and-pxe-installers
unmount the USB if it is mounted and run the script to make a startup USB.
/home/ftp/pub/Linux/Slackware/slackware-current/usb-and-pxe-installers dmesg |grep sd [86504.700524] sdb: sdb1 [86504.708517] sd 6:0:0:0: [sdb] Assuming drive cache: write through umount /dev/sdb1 sh usbimg2disk.sh -i usbboot.img -o /dev/sdb |
Boot from the USB and install the Slackware. Here is the how to do it: http://www.slackbook.org/html/installation.html. Use a network cable (makes things easier) to connect the laptop to the network, you will need it anyway to access the machine during the configuration of the access point, and after as your uplink.
5.2. Kernel configuration
It is a good idea to start by recompiling your kernel. Click on .config to download my configuration file in /usr/src/linux. This is not a fully optimized version and only the processor is set to Intel Atom and some obviously unnecessary stuff is removed. I chose not to put here a version that is too customized to my needs. I used the -j 8 option since it makes bzImage and modules faster. It seems -j 8 gives the best results, but on the first compilation you will not have this advantage. Anyway it will take forever to compile even with the -j 8 option. It is important not to forget to reinstall the MadWifi drivers, if someday you decide to optimize your kernel.
In case you want to keep Windows and resize its partition, the best solution is SystemRescueCd. Follow the instructions for installing it on a USB stick from here http://www.sysresccd.org/Sysresccd-manual-en_How_to_install_SystemRescueCd_on_an_USB-stick. It is a good idea to archive the partitions of your Aspire, in case you decide to return it back to the current state someday; if you can afford the space to keep the images.
5.3. Remote access - XDMCP
Depending on how comfortable you feel with the small keyboard and monitor of Aspire, you may consider enabling XDMCP. Here is good guide of how to do it: http://alien.slackbook.org/blog/running-x-window-on-ms-windows/. If you have CygWin already installed you would not need to install X-Server, simply run
xwin -queryAspire.IP.address
from a CygWin terminal.
5.4. For consideration:
FreeRadius http://freeradius.org/ - Formally RADIUS support is necessary only if you want the following capabilities: having WPA Enterprise authentication, being able to append more access points or authentication against external user data bases like LDAP or Novell eDirectory. It is also important to consider the choice between the standalone RADIUS server and the hostapd integrated RADIUS support. With so many choices, I thought it is a good idea to explain my arguments for choosing FreeRadius. First of all WEP in its 128 bit version is acceptable for home security, but it is so easy to configure that it takes away all the fun from the task. In its most basic configuration FreeRadius is really easy to install and configure, which means that obtaining WPA requires only a modest amount of effort. Configuring RADIUS is certainly not easy (it requires a lot of patience) and it may take days to set it up as a DAP gateway, but it is a five minutes work in the simplest scenario as in the example here with flat ASCII files. I suspect that using the hostapd integrated RADIUS allows for a lower CPU load than a separate RADIUS server and this has to be considered for small embedded routers. FreeRadius though has low processing requirements so the dedicated Aspire can easily run it.
If you opt for FreeRadius, you can download the latest version from http://freeradius.org/download.html. I used the freeradius-server-2.1.11 version. The installation is as simple as typing the command ./configure, make, make install. The following instructions can be used to configure RADIUS http://wiki.freeradius.org/Basic-configuration-HOWTO. If you used ./configure without additional options the "users" file will be created in "/usr/local/etc/raddb".
First, create some users, simply by appending at the end of the "user" file something like: User1 Cleartext-Password := "password1" Second, change the "secret=12345:-)"
Second, change the "secret=12345:-)" statement in the clients.conf. No further actions are needed since all communications in this configuration are going through the looback address that is configured by default.
Third, copy the rc.radiusd script from the freeradius-server-2.1.11/scripts to /etc/rc.d/. Run the first tests of your newly installed RADIUS server with "radiusd -X". Once you are satisfied, insert the line "/etc/rc.d/rc.radiusd start" in the "/etc/rc.d/rc.local" file. Create the file "/etc/rc.d/rc.local_shutdown", make it executable and put the corresponding "/etc/rc.d/rc.radiusd stop" in it. From now on, if there are problems with RADIUS you will look in /usr/local/var/log/radius. There is also a lot of authentication related information in /usr/local/var/log/radius/radacct/127.0.0.1.
Finally, the default self-signed certificates generated during the installation in "/usr/local/etc/raddb/certs" are good, but if you want your self-signed certificates to show something different you can generate your own. All of the certificates are located in the RADIUS sub-directory "certs".
5.5. Necessary:
MadWifi project
hostapd: IEEE 802.11 AP, IEEE 802.1X/WPA/WPA2/EAP/RADIUS Authenticator
I used hostapd-0.7.3 and madwifi-0.9.4-r4167-20110827.
First, I installed MadWifi since there is a remark about hostapd in README-WPS mentioning that hostapd needs specifications about the location of the MadWifi libraries. All the instructions for installing MadWifi are found within the INSTALL file of the source. Look in the README file in the source for the necessary kernel configuration. Make the necessary changes in your kernel or simply use my kernel .config. The only thing not mentioned that I thought necessary to do is to enter "make install" at the end, simply to be sure all is on place.
Second I installed hostapd. Here comes the most sophisticated part of the whole installation. Within the source directory (wherever you extracted it), there is a subdirectory hostapd. You need a .config file in order to compile the file. Copy the defconfig file to the .config file in the same directory and then edit the .config file. Its editing depends on the configuration that you want to build and types of authentication that you plan to support. There are many important options that need consideration when editing the .congif file. For example, do you want RADIUS and if yes with what kind of support etc. These are the changes I made to my .config:
CONFIG_DRIVER_MADWIFI=y CFLAGS += -I/tmp/2/madwifi-0.9.4-r4167-20110827 # change to the madwifi source directory CONFIG_DRIVER_NL80211=y CONFIG_WPS=y CONFIG_WPS_UPNP=y CONFIG_RADIUS_SERVER=y CONFIG_IEEE80211R=y CONFIG_DRIVER_RADIUS_ACL=y CONFIG_IEEE80211N=y |
And here is the link to get my .config which I called "hostapd.config" to avoid confusion with the kernel .config. Copy it in the hostapd subdirectory and rename it .config and then "make", "make install". Change the path to the MadWifi libraries depending on your installation location choice.
CFLAGS += -I/tmp/2/madwifi-0.9.4-r4167-20110827 |
Create the /etc/hostapd/ directory and copy in it at least the hostapd.conf file (do not confuse it with my hostapd.config it is a copy of my .config for hostapd) from the source directory. This is the changes for configuration (a.):
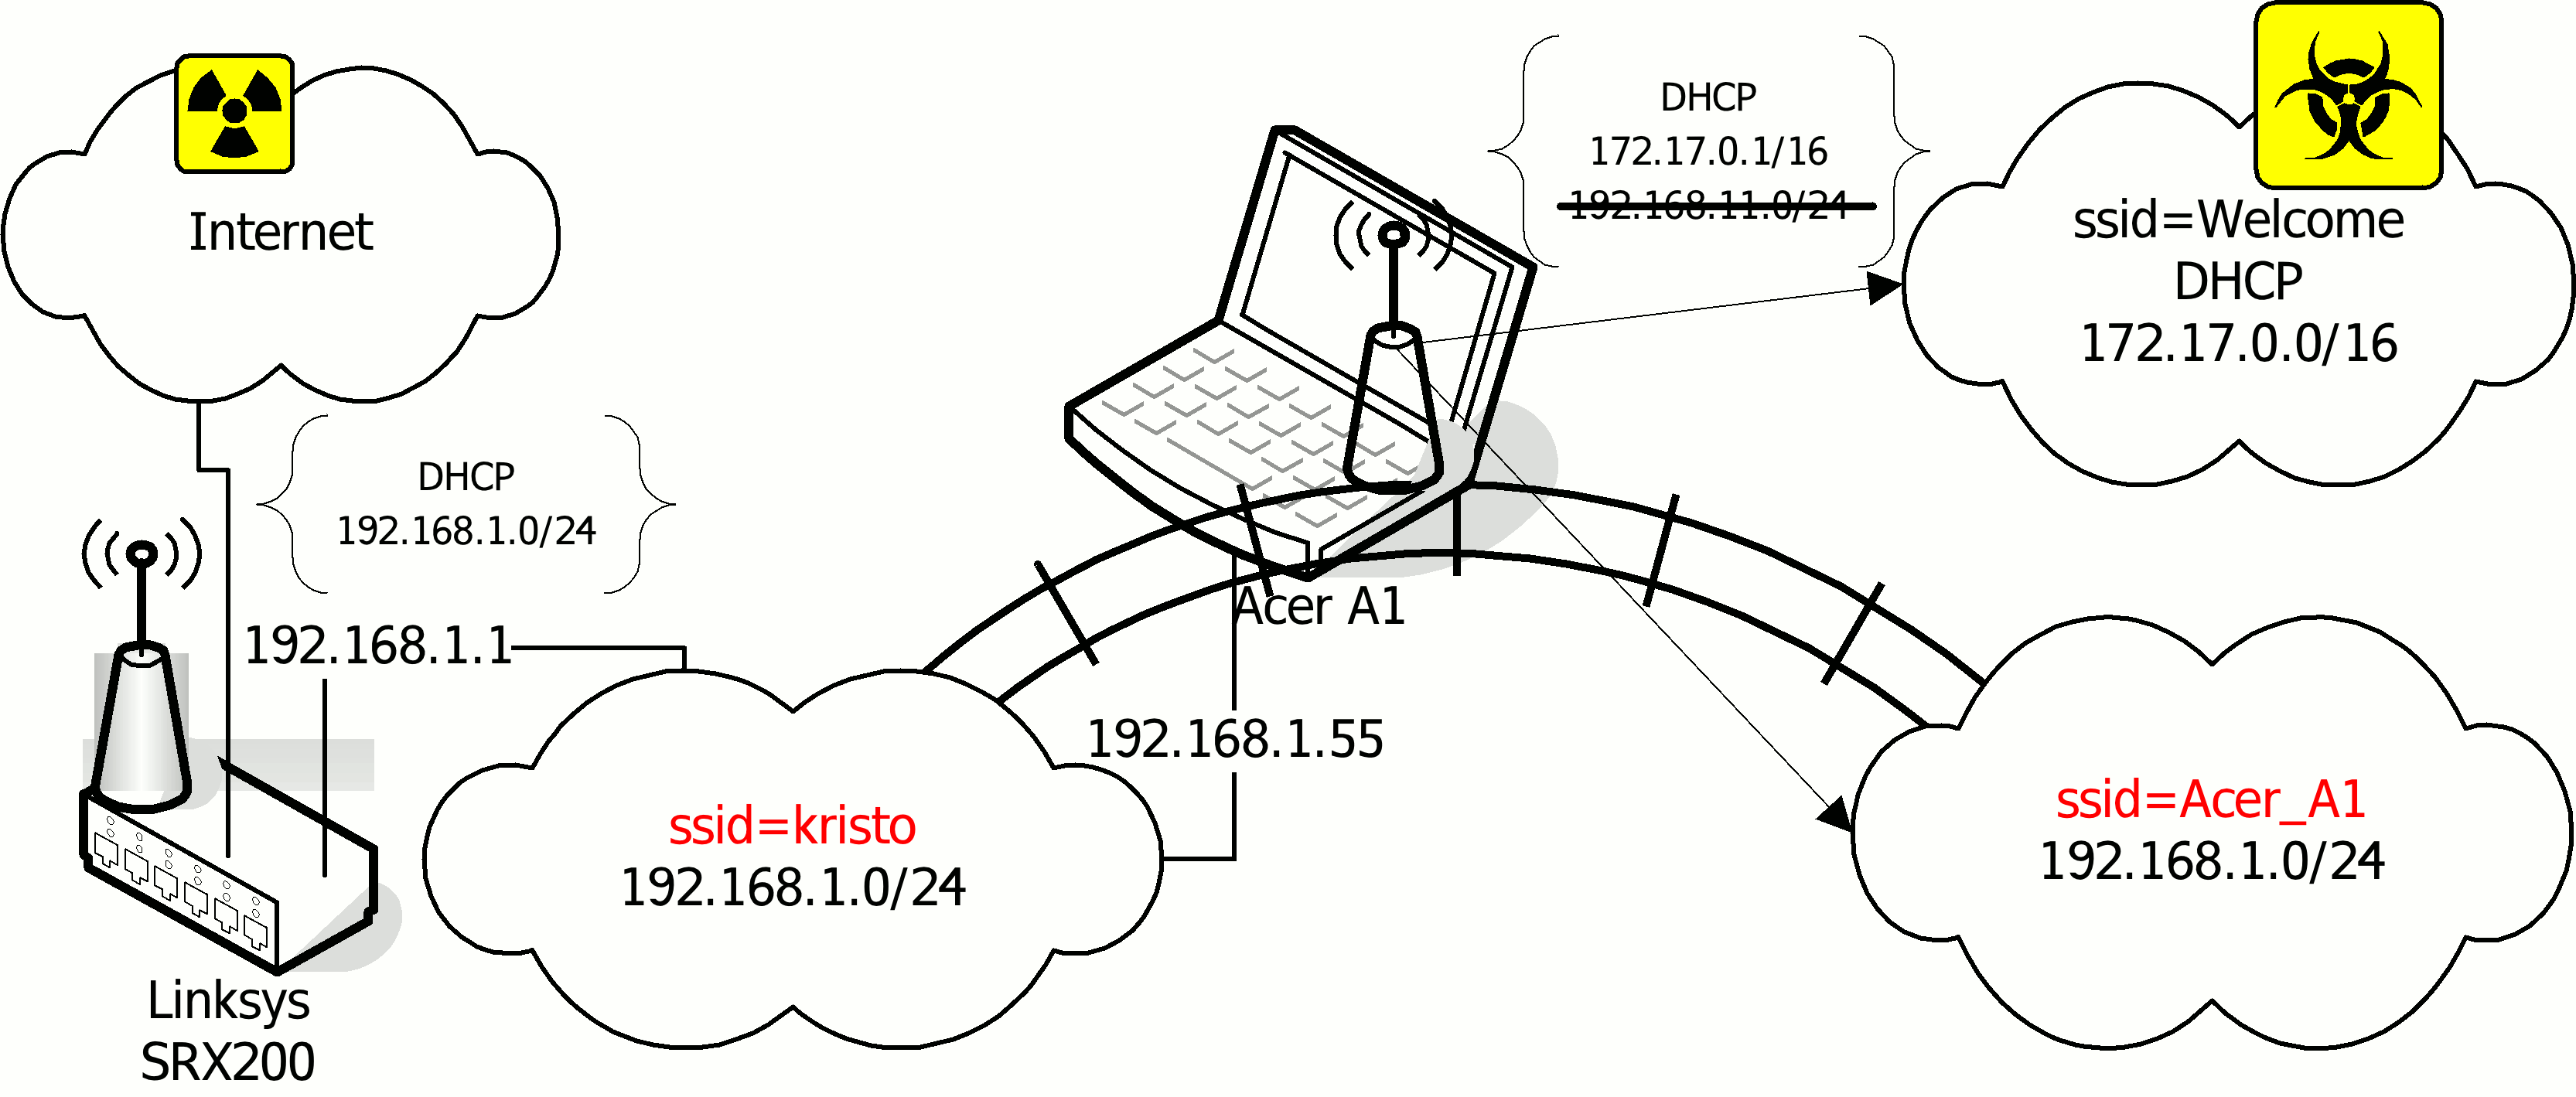
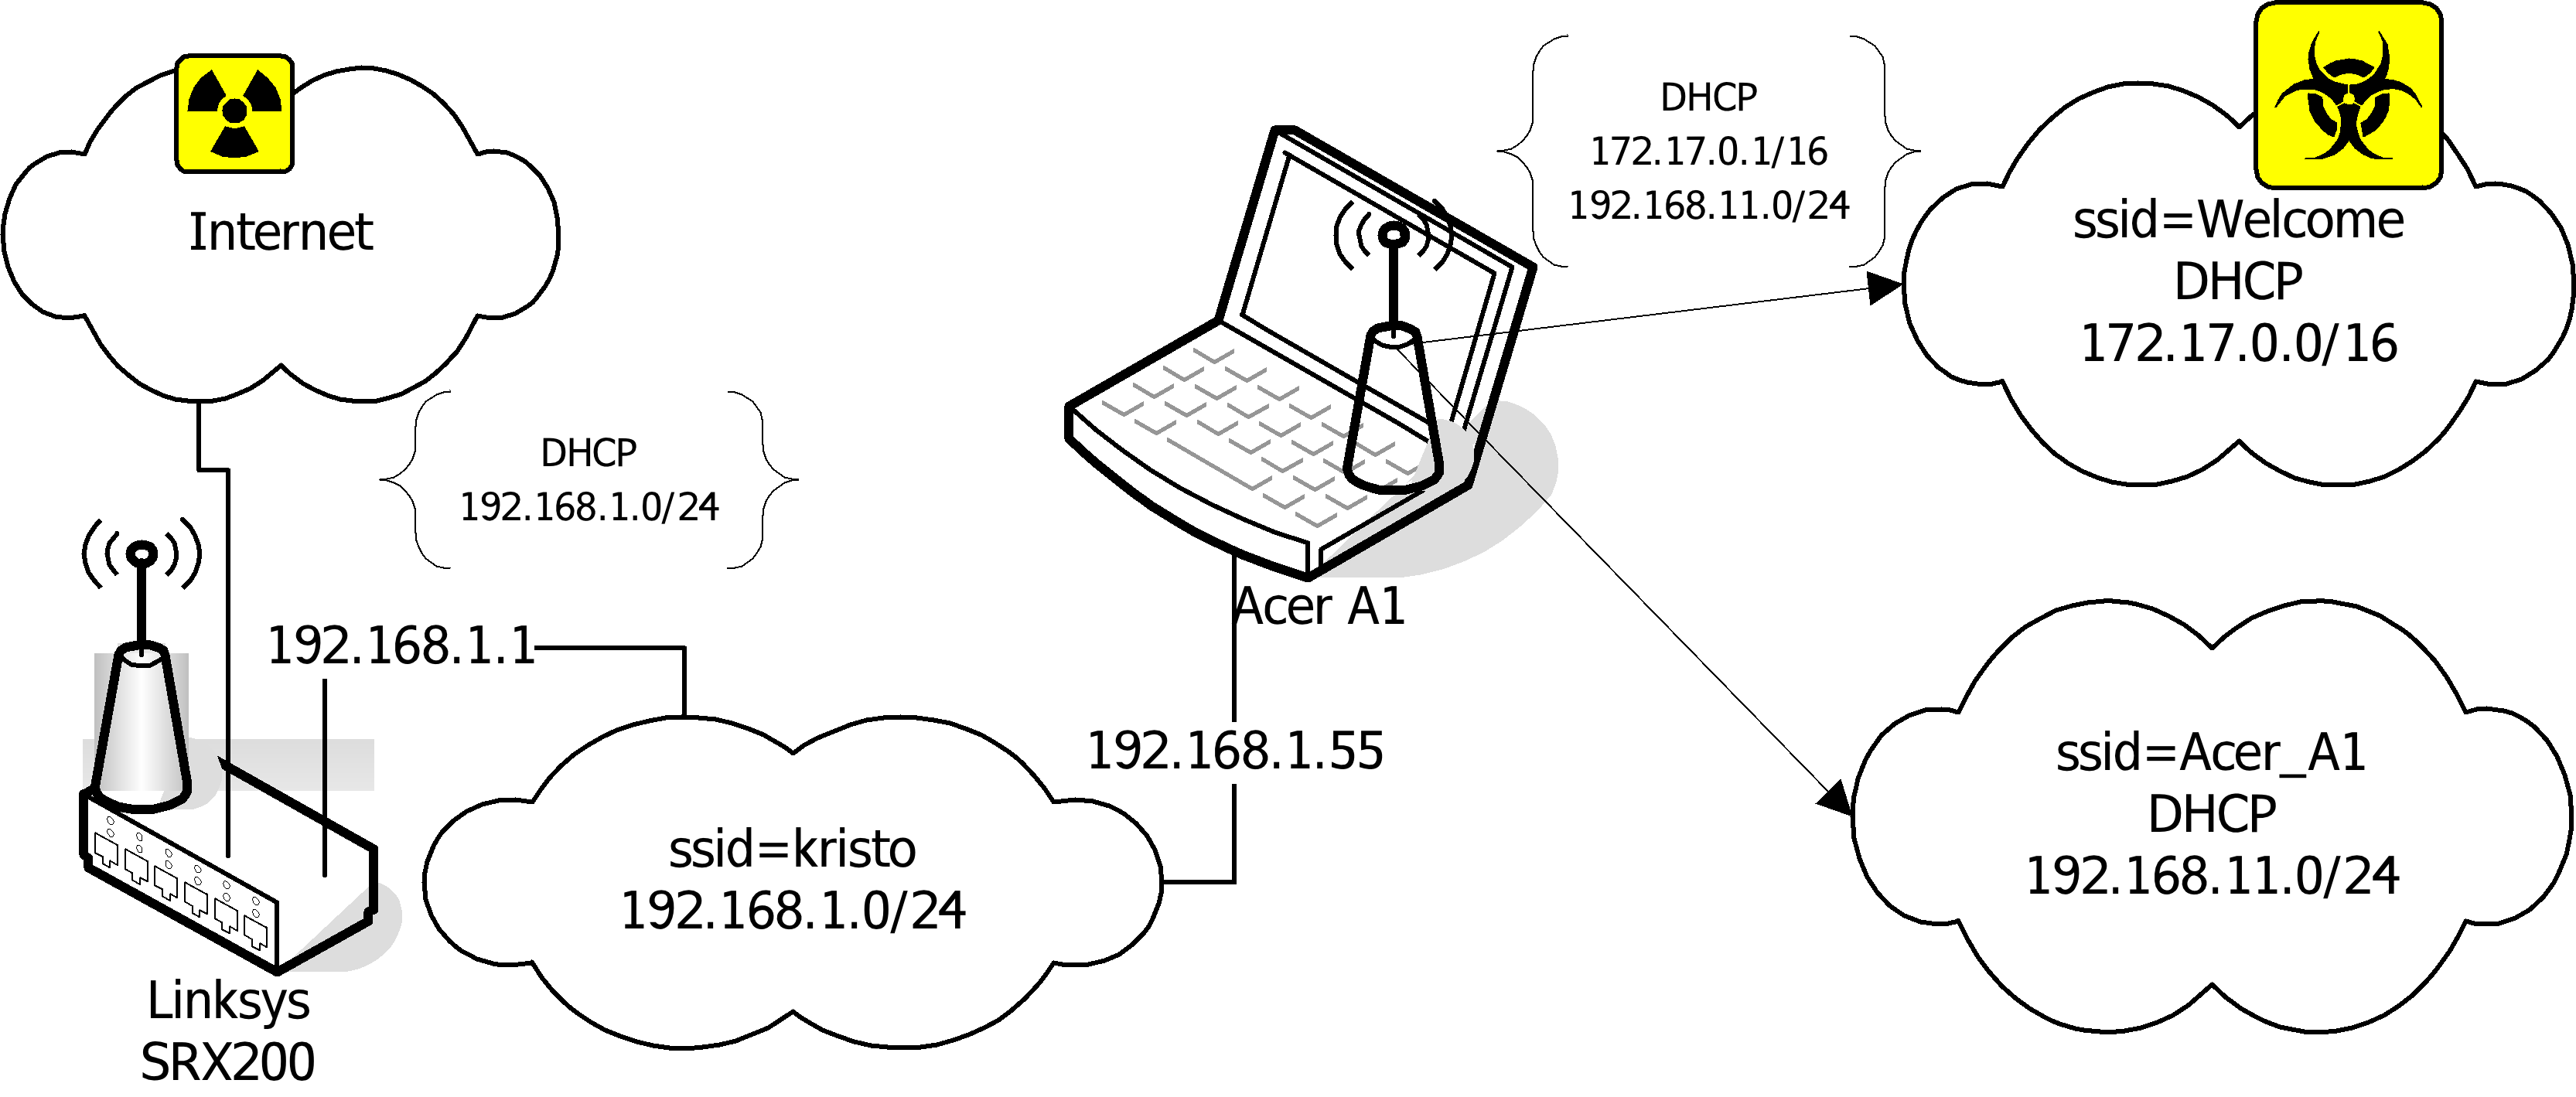
#driver=madwifi #ctrl_interface_group=0 #ssid=test ssid=Acer_A1 hw_mode=g channel=11 ieee8021x=1 eapol_key_index_workaround=1 nas_identifier=komsalov.homelinux.org auth_server_addr=127.0.0.1 auth_server_port=1812 auth_server_shared_secret=12345:-) acct_server_addr=127.0.0.1 acct_server_port=1813 acct_server_shared_secret=12345:-) wpa=1 wpa_key_mgmt=WPA-EAP wpa_pairwise=TKIP wpa_group_rekey=300 wpa_gmk_rekey=640 bss=wlan0_0 ssid=Welcome |
You may need to copy some other files and eventually create some if you decide to change the configuration and of course fix the path to them in hostapd.conf. Here is my hosapd.conf for the network configuration (a.). It can be used as it is, the only absolutely necessary change is to put your RADIUS secret.
auth_server_shared_secret=12345:-) acct_server_shared_secret=12345:-) |
At first run hostapd in the terminal, like that:
/usr/local/bin/hostapd -dd /etc/hostapd/hostapd.conf |
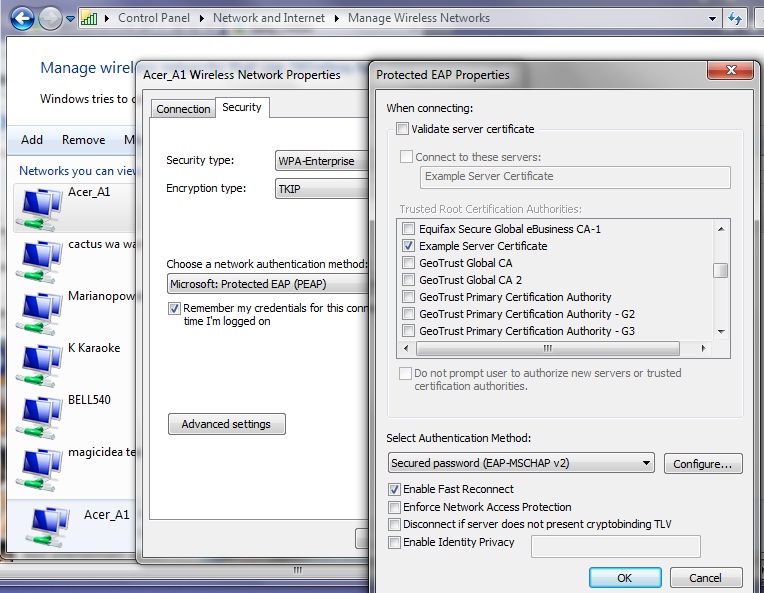
You can either start directly with my file or with the example file from the source directory first. The example file will create one open network with ssid=test, giving you some confidence. It is a good idea to begin like this before setting up the DHCP server and eventually masquerading with the firewall. This will help you pinpoint the problems that need to be fixed. If you start two or more encrypted ssid's, DHCP, DNS and the firewall at once, it will be harder to identify the source of the eventual problems. It will also be good to test the configuration with any wireless client, but Windows, even a simple iPod would be better. Configuring Windows to work with RADIUS self-signed keys for WPA is a bit tricky and it is hard to pinpoint what gives you the problem, the client or the AP. There are two things you may consider here: to use CCMP instead of TKIP and to switch from WPA to WPA2. I decided to leave this decision for configuration (c.), because this is the one I will keep until I can afford to dedicate my Aspire to configuration (b.).
You can get the rc.hostapd from http://slackbuilds.org/repository/13.0/network/hostapd/, after you get bored looking on the hostapd in a terminal and running it manually. Put the rc.hostpd in the /etc/rc.d directory, fix the paths in it, call it from /etc/rc.d/rc.local and stop it from rc.local_shutdown.
At this state your rc.local should look like this:
#!/bin/sh # # /etc/rc.d/rc.local: Local system initialization script. # # Put any local startup commands in here. Also, if you have # anything that needs to be run at shutdown time you can # make an /etc/rc.d/rc.local_shutdown script and put those # commands in there. /etc/rc.d/rc.radiusd start /sbin/ifconfig wlan0 up /sbin/iwconfig wlan0 channel auto route add default gw 192.168.1.1 /sbin/ifconfig wlan0 192.168.11.1 /etc/rc.d/rc.hostapd start /sbin/ifconfig wlan0_0 172.17.0.1 /usr/sbin/dhcpd wlan0 wlan0_0 #EOF |
And your rc.local_shutdown:
#!/bin/sh # /etc/rc.d/rc.hostapd stop /etc/rc.d/rc.radiusd start #EOF |
The "/sbin/ifconfig wlan0 up ; /sbin/iwconfig wlan0 channel auto" commands in rc.local should not be necessary, but if you do not give them you will get an error when hostapd sets the channel.
Here is my simple dhcpd.conf file:
authoritative;
ddns-update-style none;


default-lease-time 604800;
# 7 days 7*86400


max-lease-time 2592000;
# 30 days 30*86400


subnet 192.168.11.0 netmask 255.255.255.0 {
   range 192.168.11.10 192.168.11.100;
   range 192.168.11.150 192.168.11.200;


option domain-name "mydomain.org";
option broadcast-address 192.168.11.255;
option routers 192.168.11.1;
option domain-name-servers 192.168.11.1, 207.164.234.193, 207.164.234.129;


    }


subnet 172.17.0.0 netmask 255.255.0.0 {
   range 172.17.0.10 172.17.255.250;


option domain-name "mydomain.org";
option broadcast-address 172.17.255.255;
option routers 172.17.0.1;
option domain-name-servers 172.17.0.1, 207.164.234.193, 207.164.234.129;


    }


#log-facility local7; |
I decided to have a caching DNS server on the Aspire; it is not mandatory, but it is necessary to put your DNS servers in the dhcpd.conf.
5.6. Optional programs:
Firewall builder by NetCitadel http://www.fwbuilder.org/ Having a firewall is not exactly an option, but you will have to do some NAT with iptables anyway. Of course you may do it manually but I strongly recommend Firewall Builder. It is from my point of view by far the best firewall management solution on the market and is free on Linux. Here is a simple script acerap.fw generated with it for the configuration (a.), as an example. On Slackware, download the source and compile it and then run ldconfig after using "make install".
Wireshark - http://www.wireshark.org/ Wireshark is unnecessary for the current configuration, but at some moment you certainly will want to know what is going on. As you are anyway in the process of downloading and compiling, install it to have it on hand when necessary. I recommend that you put at least "./configure --enable-threads" if no other option. It improves performance and the program remains stable.
Attached Files
To refer to attachments on a page, use attachment:filename, as shown below in the list of files. Do NOT use the URL of the [get] link, since this is subject to change and can break easily.- [get | view] (2011-12-29 05:57:58, 114.7 KB) [[attachment:2AP3net_Bridge.gif]]
- [get | view] (2011-12-29 05:50:40, 114.7 KB) [[attachment:2AP3net_masq.gif]]
- [get | view] (2011-12-28 19:38:06, 6273.9 KB) [[attachment:AcerWiFi.tar.gz]]
- [get | view] (2011-12-28 19:41:02, 1654.4 KB) [[attachment:Acer_wireless_AP.pdf]]
- [get | view] (2012-05-06 15:53:26, 3870.8 KB) [[attachment:Acer_wireless_AP.tar.bz2]]
- [get | view] (2012-05-06 15:56:38, 3831.6 KB) [[attachment:Acer_wireless_AP.tar.gz]]
- [get | view] (2011-12-28 19:43:11, 1252.8 KB) [[attachment:Acer_wireless_AP_oo.odt]]
- [get | view] (2011-12-28 19:44:39, 89.1 KB) [[attachment:Acer_wireless_AP_oo.xml]]
- [get | view] (2011-12-29 05:55:59, 122.2 KB) [[attachment:Aspire_only.gif]]
- [get | view] (2011-12-29 05:42:02, 39.6 KB) [[attachment:Atheros_win.jpg]]
- [get | view] (2011-12-29 16:33:00, 149.2 KB) [[attachment:Windows_WPA_setup.jpg]]
- [get | view] (2011-12-29 19:37:38, 262.8 KB) [[attachment:acer_br.pdf]]
- [get | view] (2012-02-21 14:50:11, 15.8 KB) [[attachment:acerap.fw]]
- [get | view] (2011-12-29 19:38:02, 16.3 KB) [[attachment:acerap_br.fw]]
- [get | view] (2012-02-23 05:01:02, 114.4 KB) [[attachment:acerap_br.fwb]]
- [get | view] (2012-02-20 20:44:42, 5.1 KB) [[attachment:hostapd.config]]
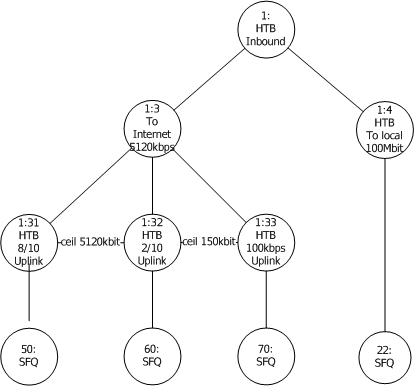
- [get | view] (2011-12-29 19:51:40, 11.1 KB) [[attachment:incoming_traffic_shaping.gif]]
- [get | view] (2012-05-08 13:02:21, 21.6 KB) [[attachment:install-a.html]]
- [get | view] (2011-12-29 22:32:09, 27.7 KB) [[attachment:iptraf.gif]]
- [get | view] (2011-12-29 22:32:25, 17.5 KB) [[attachment:iptraf_low.gif]]
- [get | view] (2012-02-20 19:53:43, 107.4 KB) [[attachment:kernel.config.2.6.38.7]]
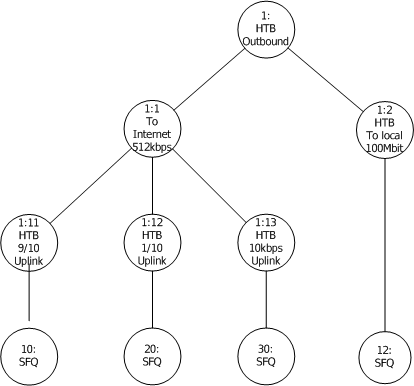
- [get | view] (2011-12-29 19:51:54, 10.6 KB) [[attachment:outgoing_traffic_shaping.gif]]
- [get | view] (2011-12-29 19:19:49, 4.1 KB) [[attachment:rc.traffic_shaping]]
You are not allowed to attach a file to this page.