Krastyo Komsalov
Montreal - Ile des Soeurs, Quebec, Canada
Email: <kkomsalov AT SPAMFREE gmail DOT com>
http://ca.linkedin.com/in/kkomsalov
Proposal for a new HOWTO
Name:
“How to turn the Acer Aspire One into a wireless access point”
Subject:
Detailed and simple to follow step by step instruction of how to make a wireless access point out of a wireless computer.
The chapter “Introduction” contains more details on the contents.
Current State:
Technical side:
All required steps are already written down.Clarifying the explanations:
The level of skills required to follow the instruction is not clearly defined. Some explanations, that I thought obvious and skipped, are probably necessary. In reverse, probably there are unnecessary explanations of obvious things.
I really need and will appreciate any advice or comment.English spelling and grammar:
I am trying to get everyone in my family and friends that are literate in English to proofread it. I suspect there are a lot of mistakes still hiding even after an extensive editing was done.Format of the document:
The initial document was written with MS Office in DOC format. The document is currently in Google Docs, which I share with whoever I manage to get to proofread it. Uploading it on Google Docs had one more unexpected advantage - Google Docs can export well formatted ODT file for further editing with Open Office. I am currently working on converting the master document to the DocBook format and integrating it with a LDP DocBook template. My idea is to use serna-free-4.4.0 as it gives me permanent and full control over the generated XML DocBook. I am worried about future eventual problems, as Serna supports only DocBook V4.4 and V4.5. Converting an LDP template from DocBook V4.2 to V4.5 or V4.4 is easy, but I do not know how difficult it will be to convert the final document from V4.5 or V4.4 back to V4.2.
Remarks:
The configuration is not dependent on “Acer Aspire”, even it is in the title and it is only built with it.
The only real hardware requirement is a wireless adapter with AP support.At least for now, the most recent edition of the document is in PDF on
http://komsalov.homelinux.org/AcerWiFi/Acer_wireless_AP.pdf.
Downloading it is not fast, but it is good enough.
In order to get a look on the technical side of the document the version below is good enough as the only difference is the number of spelling and grammar errors.
Uploded Files:
PDF version: Acer_wireless_AP.pdf
ODT version from OO: Acer_wireless_AP_oo.odt
DocBook export from OO: Acer_wireless_AP_oo.xml
Entire subfolder with all related files: AcerWiFi.tar.gz
How to turn the Acer Aspire One into a wireless access point
Krastyo Komsalov
October 9, 2011
Table of Contents
1. Introduction
2. Hardware description
3. Some possible network configurations:
a. Keep old router and append Aspire inside, providing two additional wireless networks.
c. Bridging between the two private networks and NATing only “Welcome” public network.
5. Configuration (b.) - VLAN’s and switches
6. Configuration (c.) - bridging
7. Clients setup – WPA and WPA2 with self-signed certificates
8. Additional administrative tasks you may consider necessary.
9. Some final words.
10. Copyright
1. Introduction
The main reason for writing this document is to share my surprise of how easy it is to convert the Aspire One into a wireless access point on Slackware and how good the Aspire One hardware is for this. Accidentally, I happened to have some free time and one three year old Aspire in my hands so I decided to do something about my growing dissatisfaction with my home router. I live in a crowded Wi-Fi area with over 30 access points coming from the apartments around me and my router obviously has troubles with this. What I wanted was a wireless router over which I will have full control of all settings: log levels control, ability to install additional software for traffic analysis, a decent iptables firewall, RADIUS; in short a wireless router with full Linux installed on it.
- I chose to use Free RADIUS, since I wanted not only support for WPA and the ability to append eventual access points with roaming, but also the extensibility to any user data base, from local flat files to LDAP. Hostapd has its own integrated RADIUS, but the freedom of having FreeRADIUS was so tempting; besides the setup with flat ASCII users file is really easy. In this configuration RADIUS is set up to use files.
- Ipv6 and DNSSEC are here to stay and no embedded router has all the functionality which I have with Linux. Ipv6 and DNSSEC configuration is not included in this HOWTO guide, but the freedom to configure them is there.
- I wanted to have not only a standard firewall, but the full power of iptables. A simple functionality like SSH tunnels that allows home access from school for my kids is tricky with my router and traffic shaping is simply not available. For this reason the Firewall Builder is included in this configuration with a basic rule set. I think it is by far the best firewall management solution on the market and it is free for Linux users.
- I wanted to have at least two wireless networks “different ssid”, to open safely one of them and share some of my bandwidth with my neighbours. This I hope will make me feel less ripped-off next time I pay my internet bill.
The other solution OpenWrt had two disadvantages: my router is too weak to support OpenWrt and any router that is powerful enough for everything that I want will cost nearly as much or more then the Aspire; which I already have.
There are no requirements or specific instructions for any specific Linux collection in this configuration. I chose Slackware because I love it, I can’t put it in better words then it is in “Ten reasons for giving Slackware Linux a go” by Jack Wallen.
2. Hardware description
My Acer Aspire One has a Model KAV10, which is one of Acer’s oldest models. Since then Acer has produced many new models, but the only important part for this configuration is the model of the wireless adapter within it. From what I found Acer has been changing the adapter in nearly all newer models of Aspire. All the models I checked come with a different adapter made by Atheros (although its important to verify the producer). If you are thinking of buying the laptop, check in advance its wireless adapter. For mine, lspci and dmesg are giving this:
bash-4.1# lspci
01:00.0 Ethernet controller: Atheros Communications Inc. AR5001 Wireless Network Adapter (rev 01)
03:00.0 Ethernet controller: Atheros Communications AR8121/AR8113/AR8114 Gigabit or Fast Ethernet (rev b0)
bash-4.1# dmesg |grep Atheros
[ 10.367156] ath5k phy0: Atheros AR2425 chip found (MAC: 0xe2, PHY: 0x70)
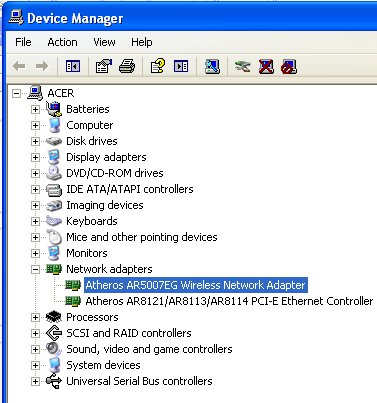
This is really good news as it seems that Atheros is one of the best supported adapters on Linux (the people from The MadWifi project are doing excellent work). Surprisingly Windows is giving different information:

If it turns out that your adapter is different from mine, you will have to investigate further in order to be sure it supports AP mode. To accomplish this you will need the “iw” command. You probably have it already, but for the source and some documentation go to:
http://linuxwireless.org/en/users/Documentation/iw
The most informative sintax is:
iw list
It will give you a pretty long output. In it look for the part that is similar to the following:
Supported interface modes:
* IBSS
* managed
* AP
* AP/VLAN
* monitor
* mesh point
Supported commands:
If there is a line “* AP” it is good news, you have the necessary AP support for hostapd.
If it turns out that your chipset is different from mine you can check if it is supported on the MadWifi website. The MadWifi website is also by far the best source of documentation I have found. This will be one of your primary sources of knowledge when you decide to adjust to your needs, experiment or simply improve the configuration given below.
If you do not have Linux already installed, you can boot it from Slackware or SystemRescueCd USB stick and do some investigation on your Aspire.
The model of my old router “Linksys SRX 200” shown as part of two of the three configurations is not important. You may use any wireless router if you have any or avoid using it at all if you decide to permanently dedicate the Aspire as your Wireless router.
3. Some possible network configurations:
a. Keep your old router and append the Aspire inside, providing two additional wireless networks.

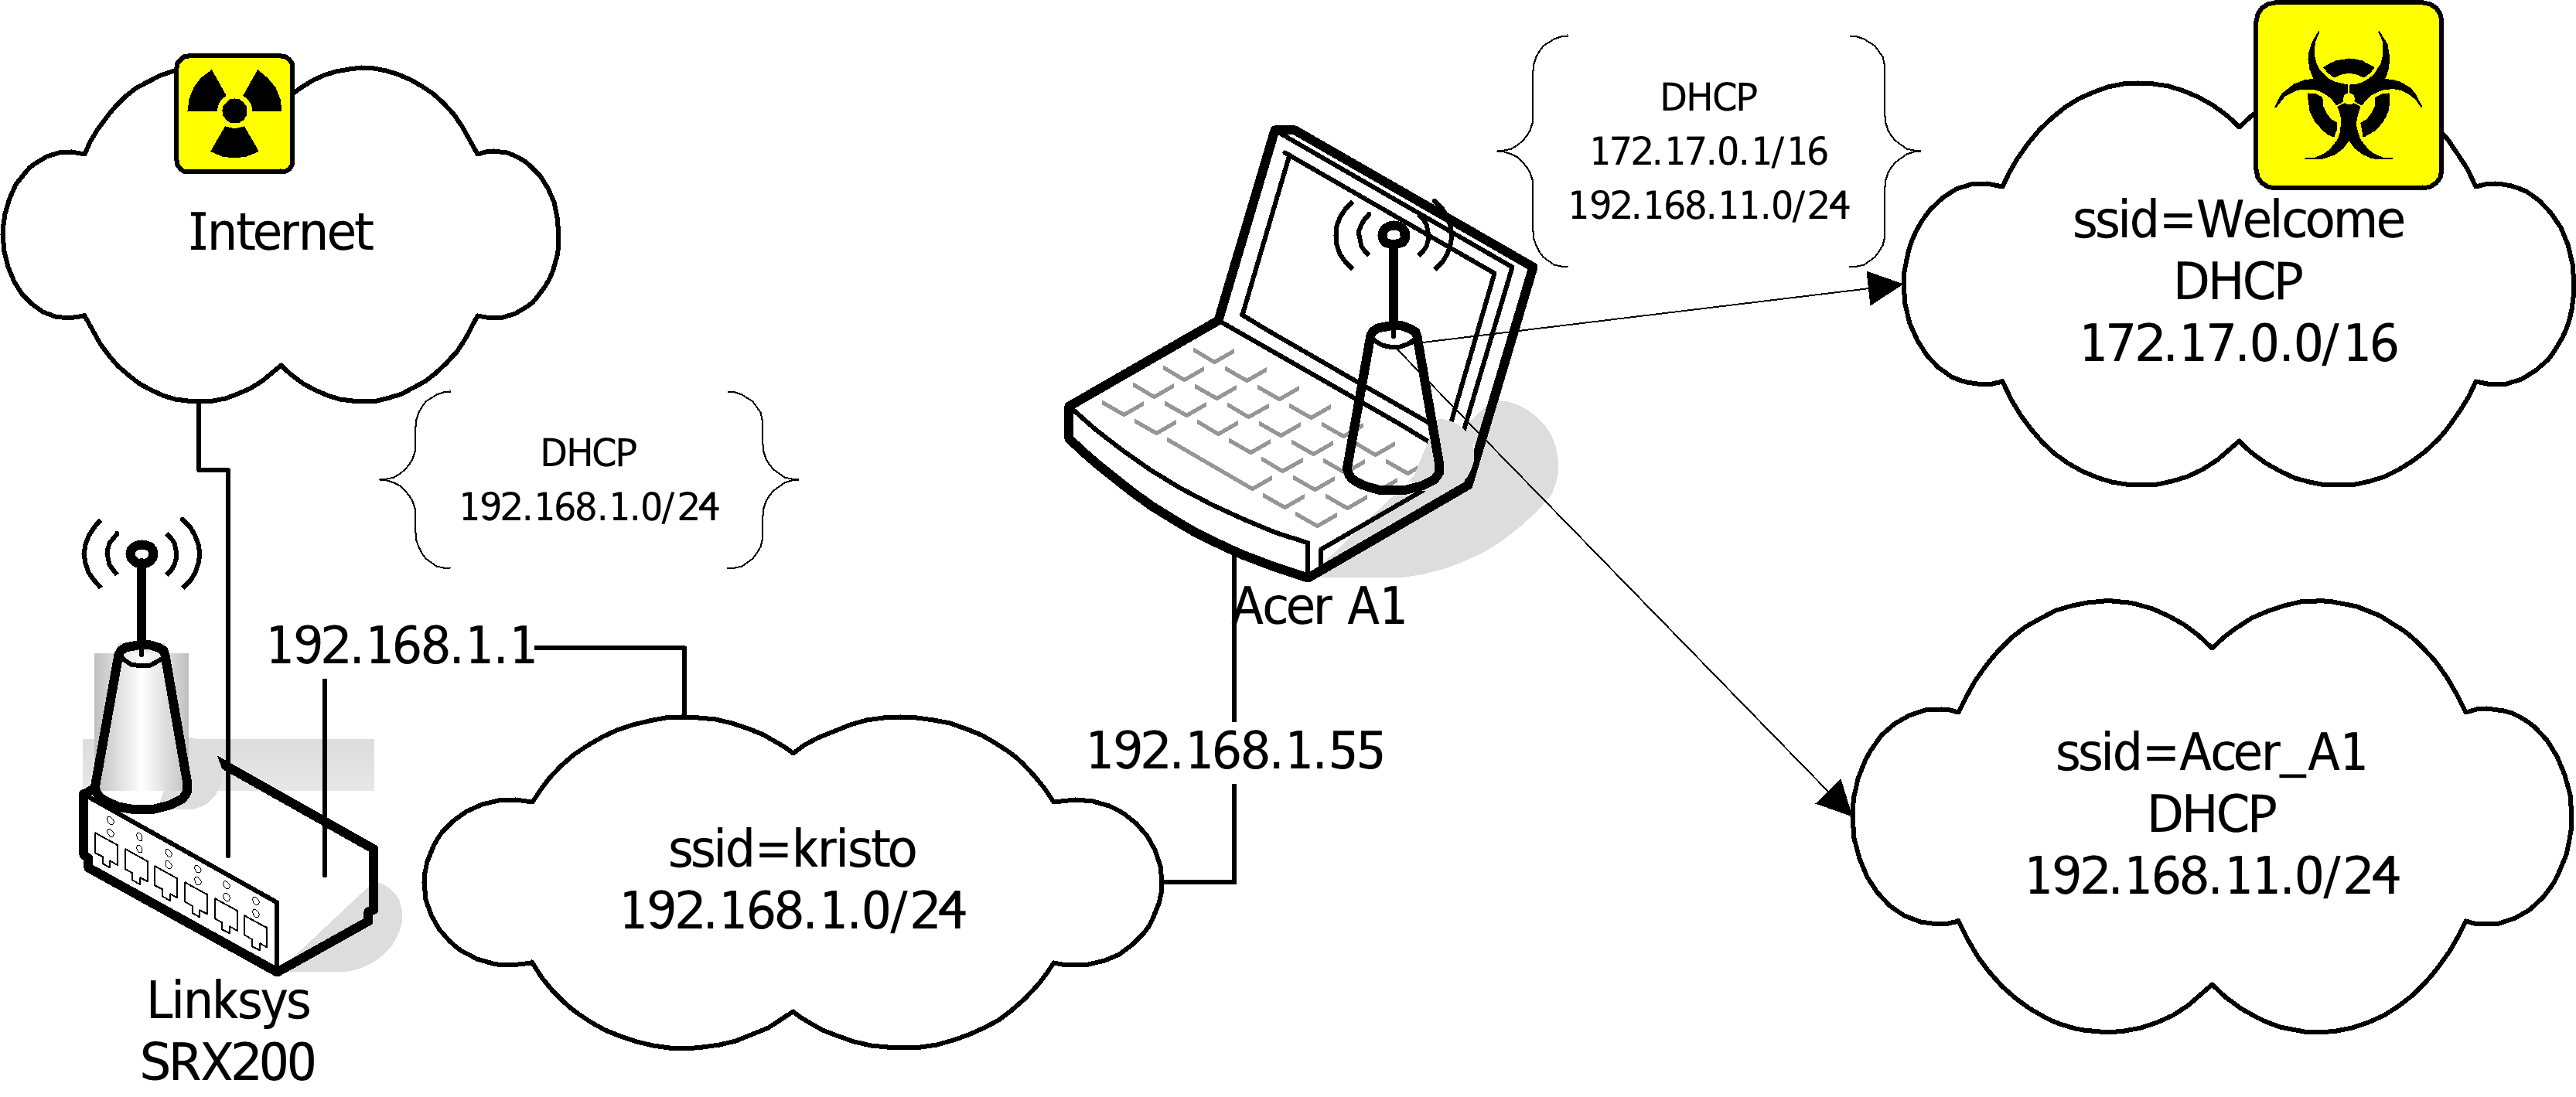
In this configuration the Ethernet port of the Aspire is connected directly to “SRX 200”. This solves the problem of Aspire having only one Ethernet port. Two Ethernet ports required are one for the Internet link the other for the internal switch to provide Internet access to Ethernet connected computers. The two wireless networks are NAT’ed to the 192.168.1.55 IP address. The reason for this is not only to put ssid “Welcome” in a separate network and simplify firewalling, but also to resolve some NAT and routing problems. First the devices in 192.168.1.0/24 must have a route to 192.168.11.0/24. I had no problem adding routes within Linux and Solaris, but my network printer simply has no such thing as a routing table in its web interface. Second, appending the route in “SRX 200” is not a problem, but “SRX 200” refuses to NAT any other network than the one connected to its interface. This is probably solvable by sub-networking its network, but I think the next configurations (b.) and (c.) are better solutions. Even with all its disadvantages, I think this configuration is the best starting point as it will not cause any disruptions or changes in your current setup until all configurations on Aspire are done and tested; then it can easily be converted to any other.
b. Using only Aspire as AP.

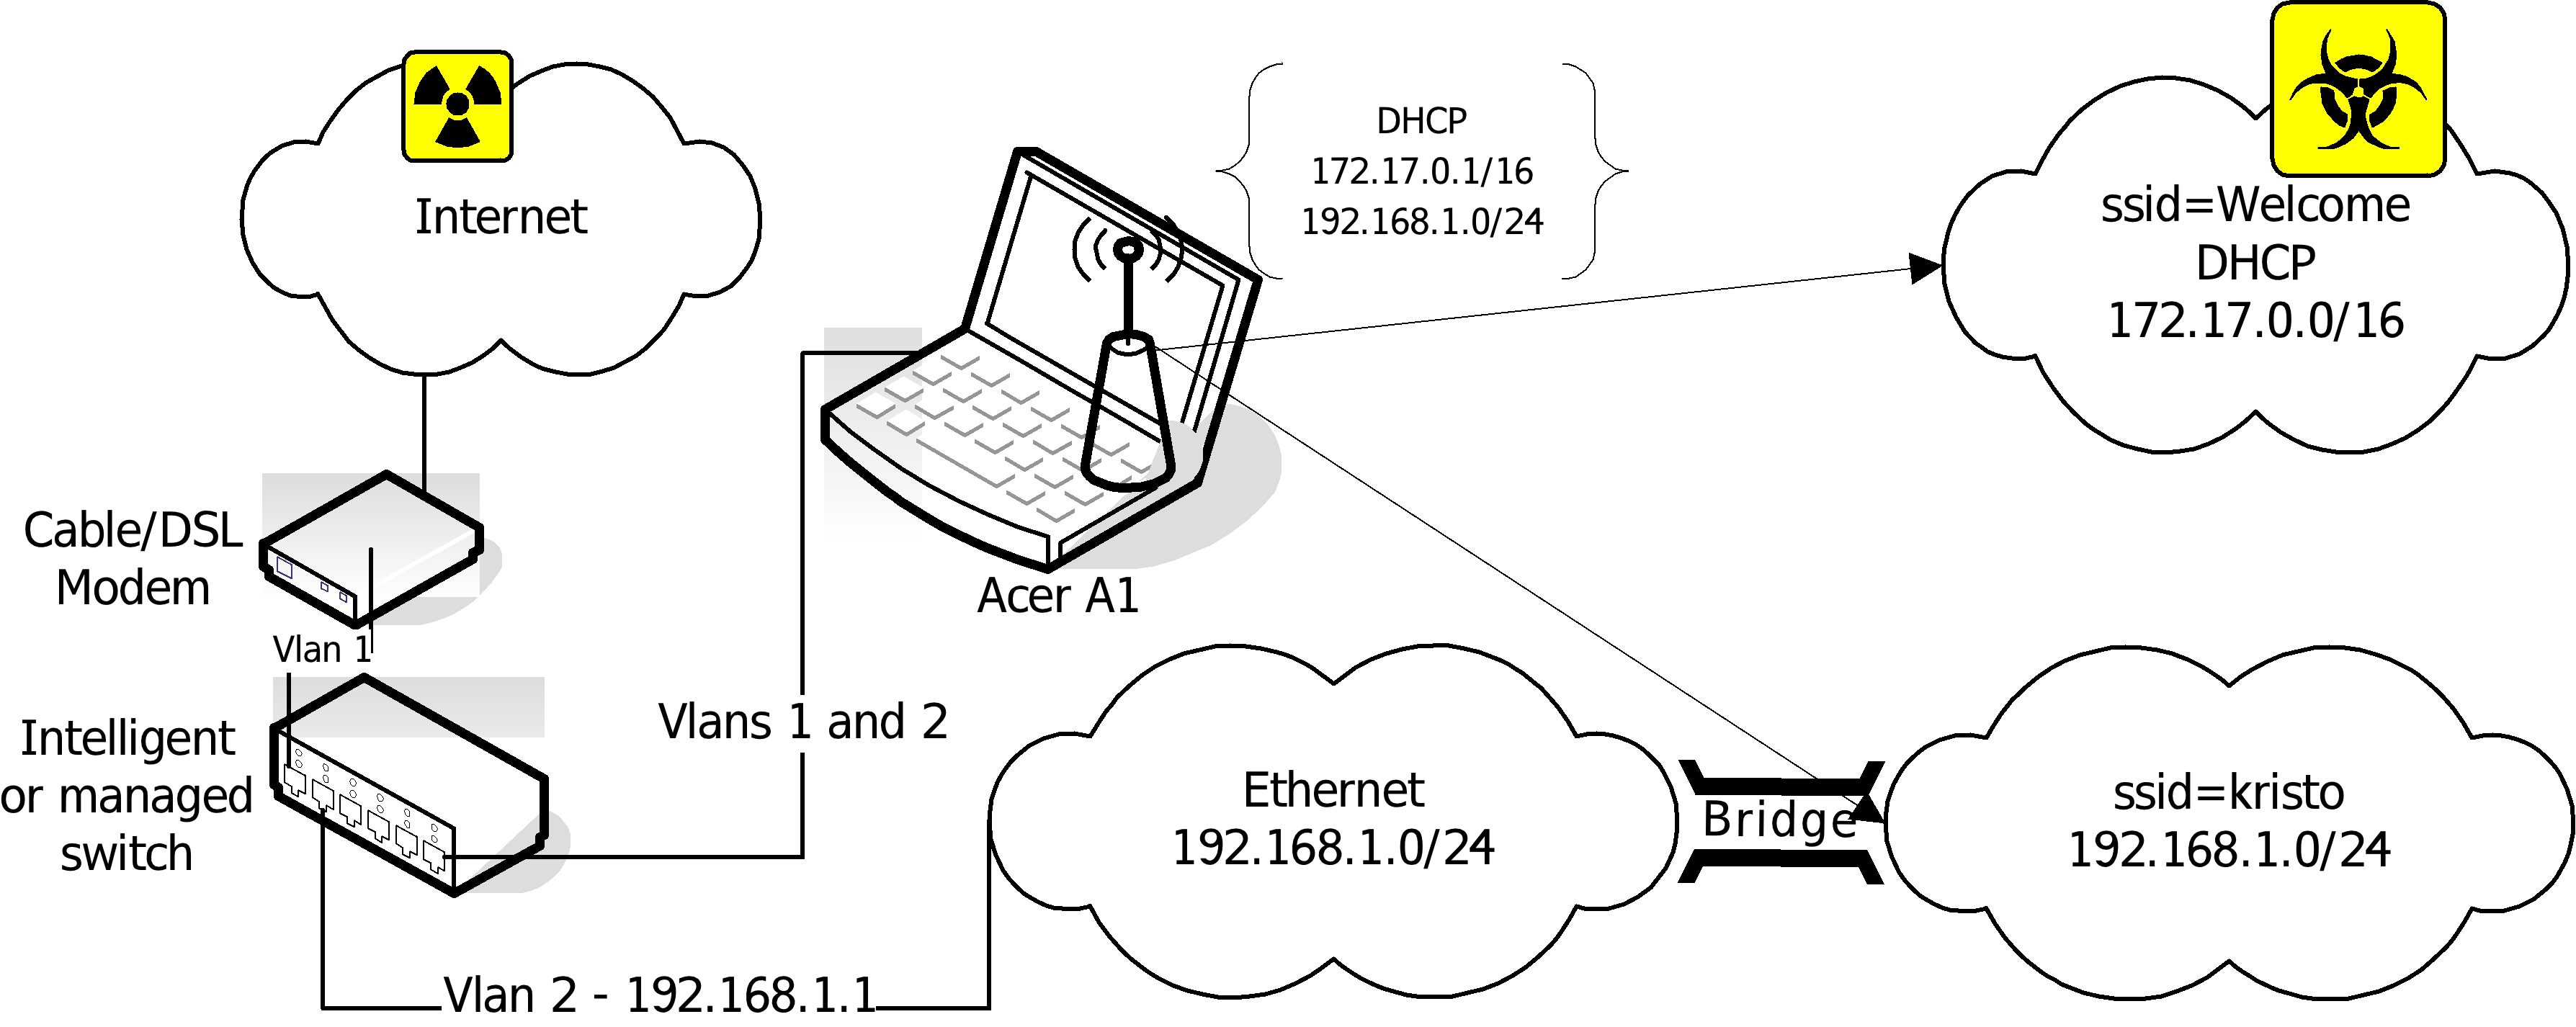
This configuration is setting you free from any later worries and is the optimal variant, but there is a price to pay. Since the Aspire has only one Ethernet adapter you have to append a second one. There are two solutions. The first one “shown on the picture” is to use an intelligent or managed switch to VLAN the eth0. The second one is to use a USB to Ethernet adapter, to convert one of the USB ports to Ethernet. The drawback of the switch solution is that it is much more expensive, though it has the advantage of speed, stability and simplicity. The USB to Ethernet adapter is much cheaper, but it comes with a doubtful Linux driver support and uncertain speed and reliability.
There is one more small detail to mention: depending what kind of Internet connection you have there will be different setups for the uplink adapter. If you use a cable connection than it simply has to be on DHCP. In the case of ADSL (my case) you will need to configure a PPPoE. On Slackware you simply have to run a pppoe-setup script.
c. Bridging between the two private networks and NATing only “Welcome” public network.

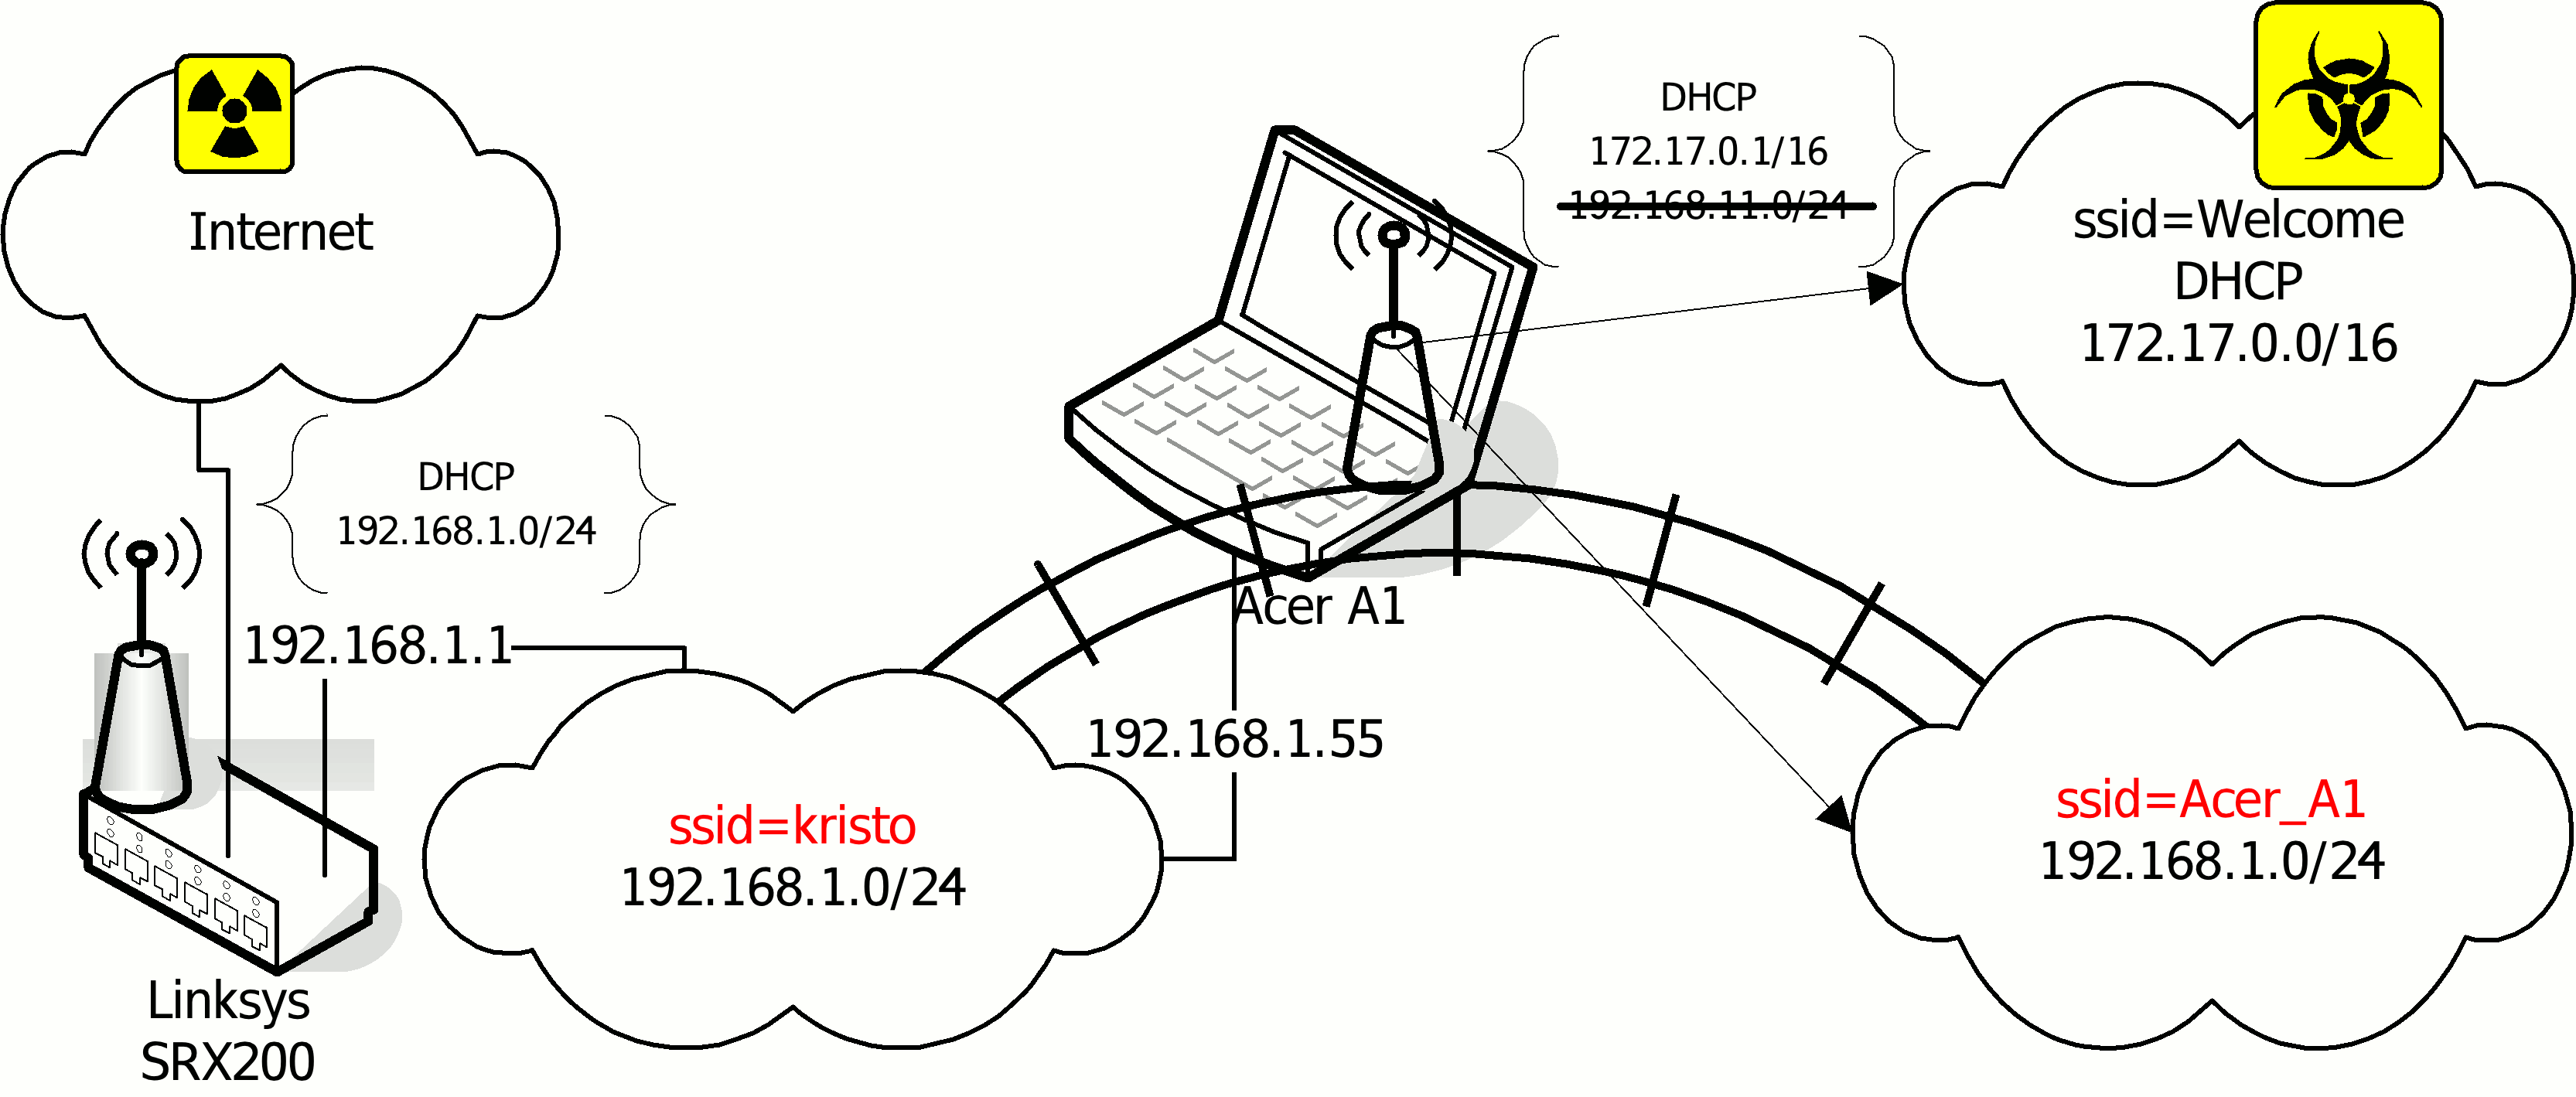
In this configuration the interfaces eth0 and wlan0 are bridged. The network 192.168.1.0/24 can be accessed either through “kristo” or “Acer_A1” ssid. The DHCP server on the Aspire is bind only to the wlan0_0 interface. NAT to 192.168.1.55 is only done for 172.17.0.0/16. The computers assessing the 192.168.1.0/24 network through ssid “Acer_A1” are getting IP addresses from the DHCP server on “SRX 200”. Other solutions will be available if the DHCP server on “SRX 200” was more manageable. For example, instead of bridging the two parts of 192.168.1.0/24, it will be more elegant to subnet 192.168.1.0/24 and setup a DHCP helper for the part in ssid “Acer_A1”.
This configuration has two advantages. The first is that it avoids both, the routing problem of the solution (a.) and the consequent NAT’ing of the “Acer_A1”. Second, it allows the Aspire to be turned off while networking remains through your old router. If you can’t afford to dedicate your Aspire as AP, this is the best configuration. It provides a stable network when you do not need the Aspire and allows you to disconnect the Aspire from the network for personal use, while preserving a functional network.
4. Initial Configuration (a.) - installation instructions for all the necessary software for all configurations.
I installed all the necessary programs from the source in /usr/local. I left some configuration files in /usr/local/etc and moved some in /etc/. There are Slackware packages on SlackBuilds.org or you can make your own if you decide it is worth the effort, considering that installing it from source is easier.
a. The easiest way of installing Slackware on Acer Aspire One
This chapter is probably unnecessary, but I love to preach about Slackware. ass="anchor" id="line-166">�
![[LDP]](/moin_static184/ldp/tldp.png)
